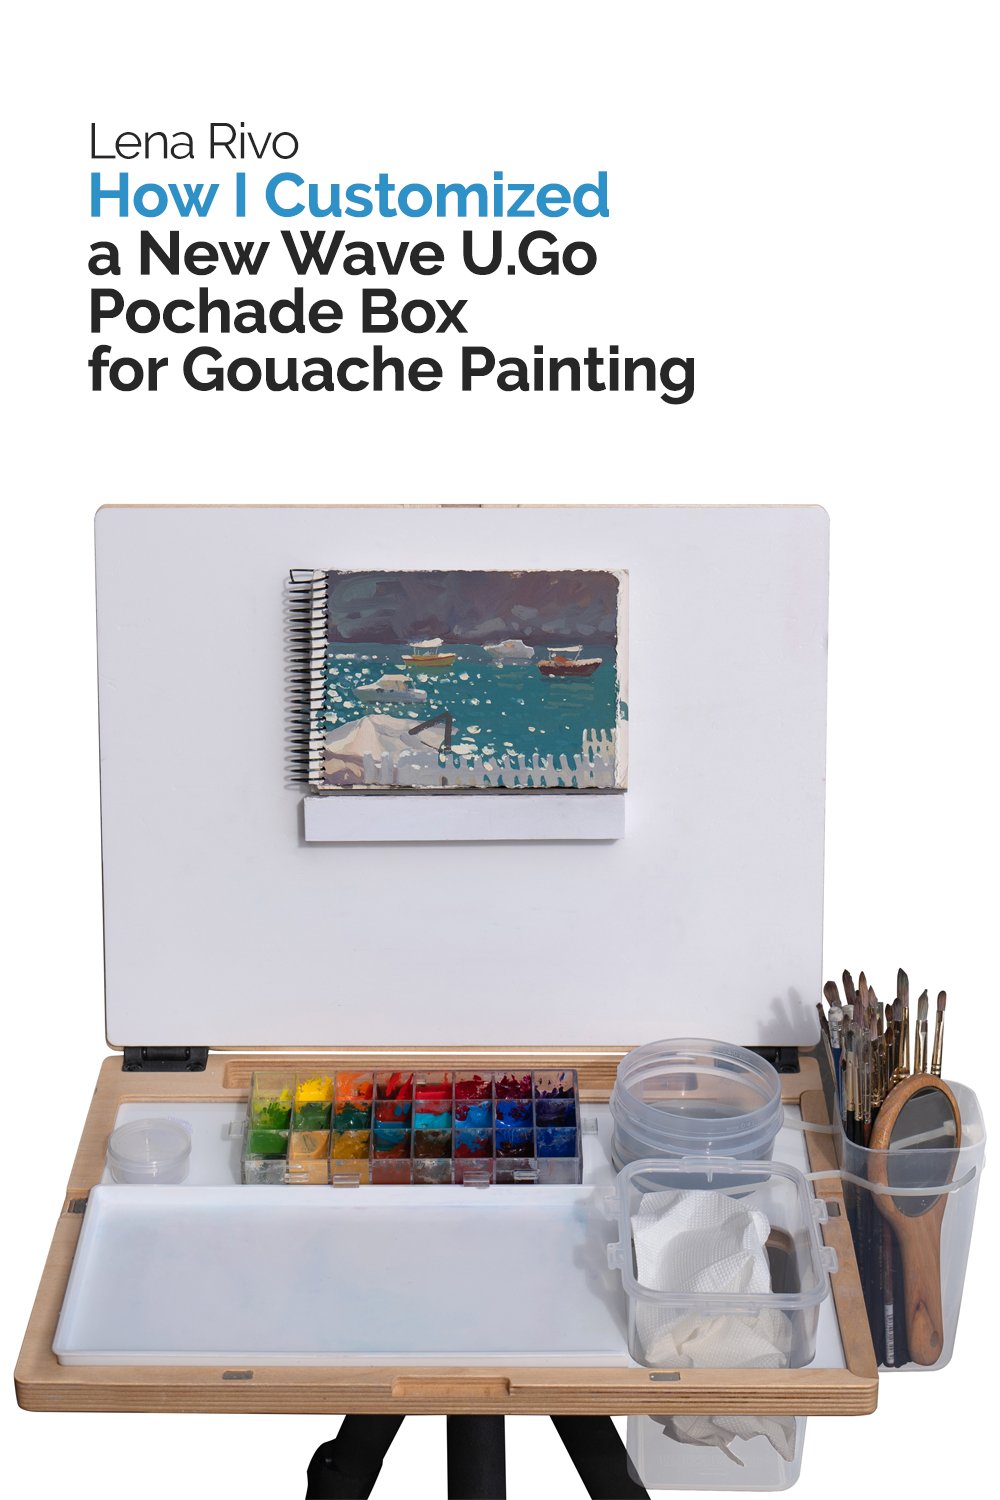
How I Customized a New Wave U.Go Pochade Box for Gouache Painting
I wrote this article in response to the numerous requests to explain how I modified my New Wave U.Go pochade box for painting with gouache.

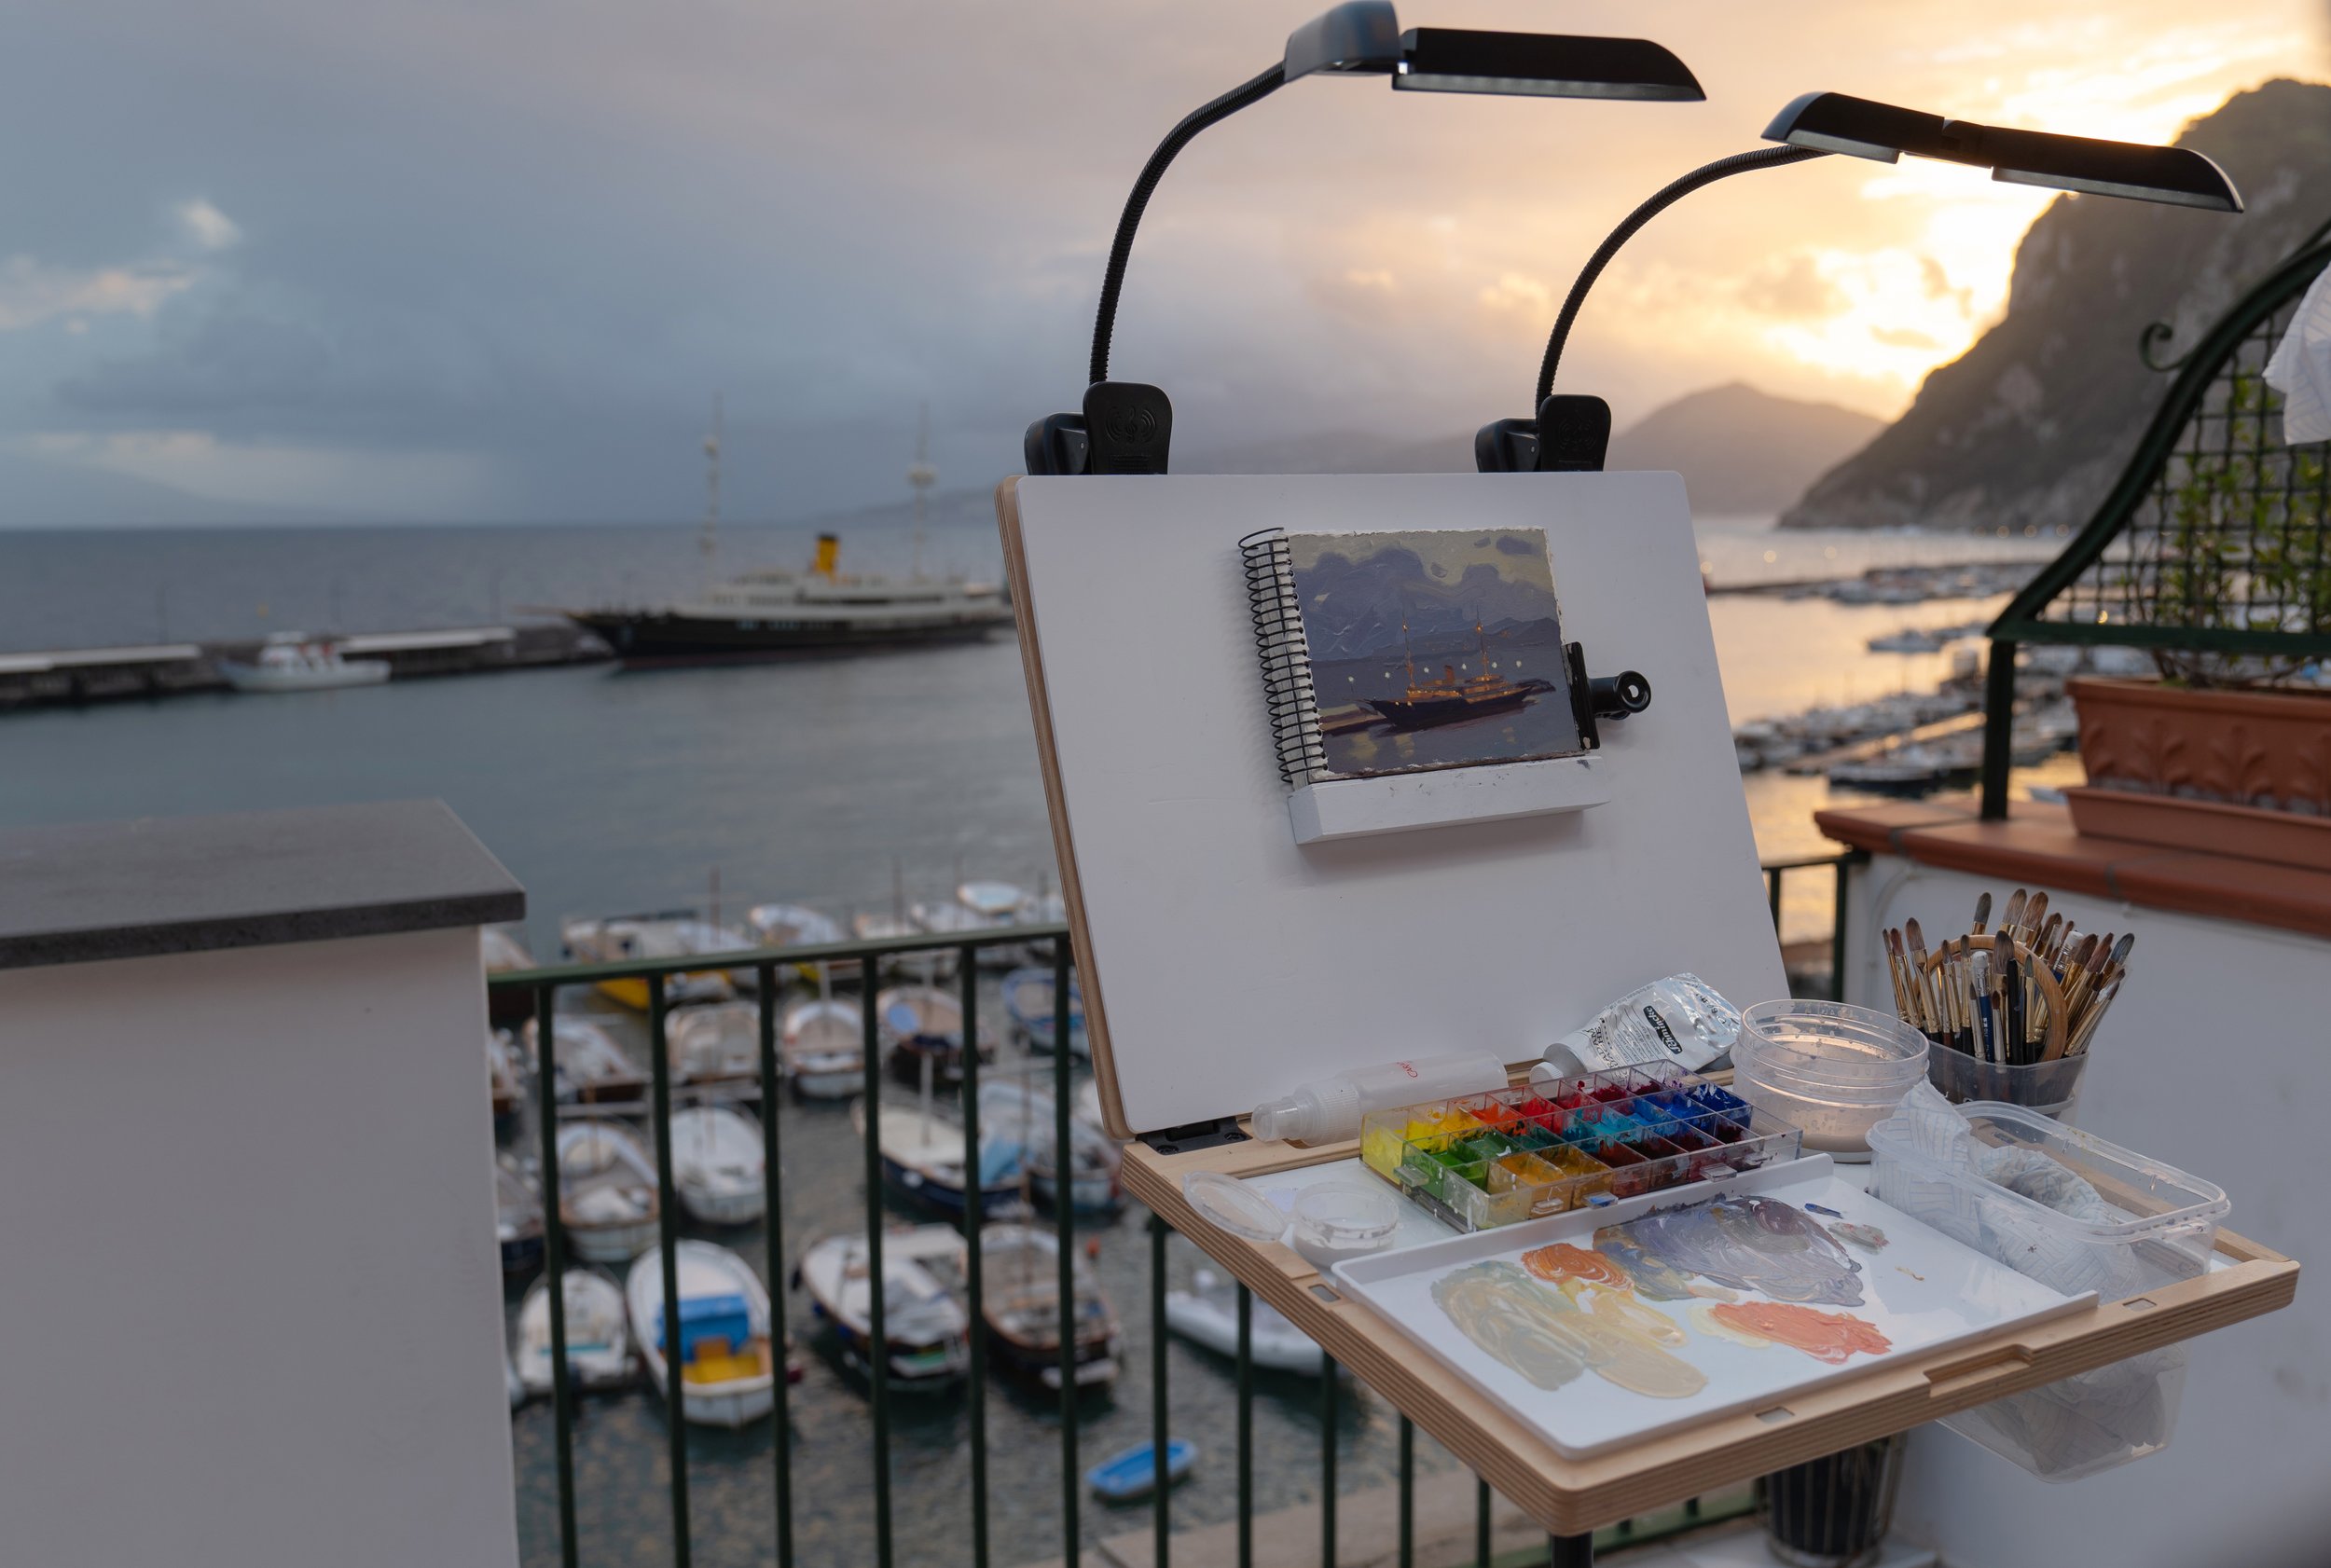
Last summer, I decided to travel to the island of Capri in Italy to capture the beauty of that spectacular place with my gouache paints.
Up until that point, I had mostly traveled by car, so the weight and size of my painting equipment weren’t a concern. I happily used my bulky Guerrilla Painter 9x12 pochade box because I never had to carry it far from the car. However, in Capri, I would need to transport my painting gear over long distances. Therefore, I needed a slimmer, more lightweight plein air easel that would fit easily into my backpack. While the market offers plenty of compact plein-air easels for oil painting, I struggled to find one suitable for gouache that met all my needs. Ideally, it should hold my color palette and mixing tray, the two cups for water and paper towels, and my cup for brushes. It should also accommodate a sketchbook and loose sheets of paper, not just panels.
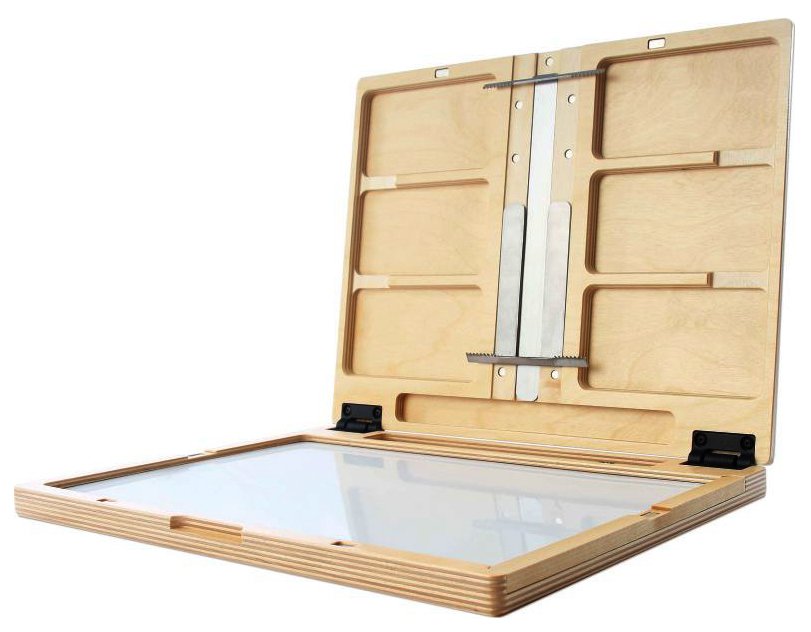
After doing some research, it became clear that I needed to find an easel that could be easily adapted for use with gouache. The New Wave U.Go pochade box, measuring 11” x 14.5”, seemed to be the best choice. I asked my husband, who enjoys DIY projects, if it was possible to cut a couple of holes in the bottom part of the box without compromising its structure, and he said yes. So, I purchased the easel, and we began its transformation.
Disclaimer: While I am going to provide detailed information on the modifications my husband and I made to adapt the U.Go Pochade box for gouache painting, please note that this work was challenging and required specific skills in woodworking, as well as access to specialized tools. If you consider similar adjustments to your equipment, I strongly recommend seeking assistance from someone experienced in crafting, sawing, and drilling wood, and who possesses the necessary tools. Attempting these modifications without the proper skills or tools could result in damage to your equipment or even personal injury.
The U.Go easel features a sliding plastic palette that can be removed for cleaning or replacement. Initially, I considered cutting two holes in the easel's wooden base and this plastic palette to hold the cups, allowing me to mix colors directly on the palette without using a separate tray. However, after attempting to mix gouache on it, I discovered that its water-repellent surface caused the paint to bead up, making mixing gouache paints very uncomfortable.
The solution presented itself unexpectedly. A few years back, I had purchased a white plastic container with a lid from IKEA; I needed only the container, so the lid was put aside. Since it was white and sturdy, I decided to try to use it as amixing tray in my studio, and it proved to be ideal for gouache. Although my container was small, I knew IKEA offered it in various sizes. A quick search on IKEA's website led us to the right size. Upon its arrival, my husband used a small hand saw to cut the lid into the necessary rectangle, which we thought solved the palette issue.
Once he had gathered all the necessary materials, he proceeded to cut four matching holes: two in the easel's wooden base and two in the plastic palette. The diameter of the holes was determined by the size of the cups I use for gouache painting. I assisted him during this process, and I must say it wasn’t easy; both the wood and the plastic were quite tough.
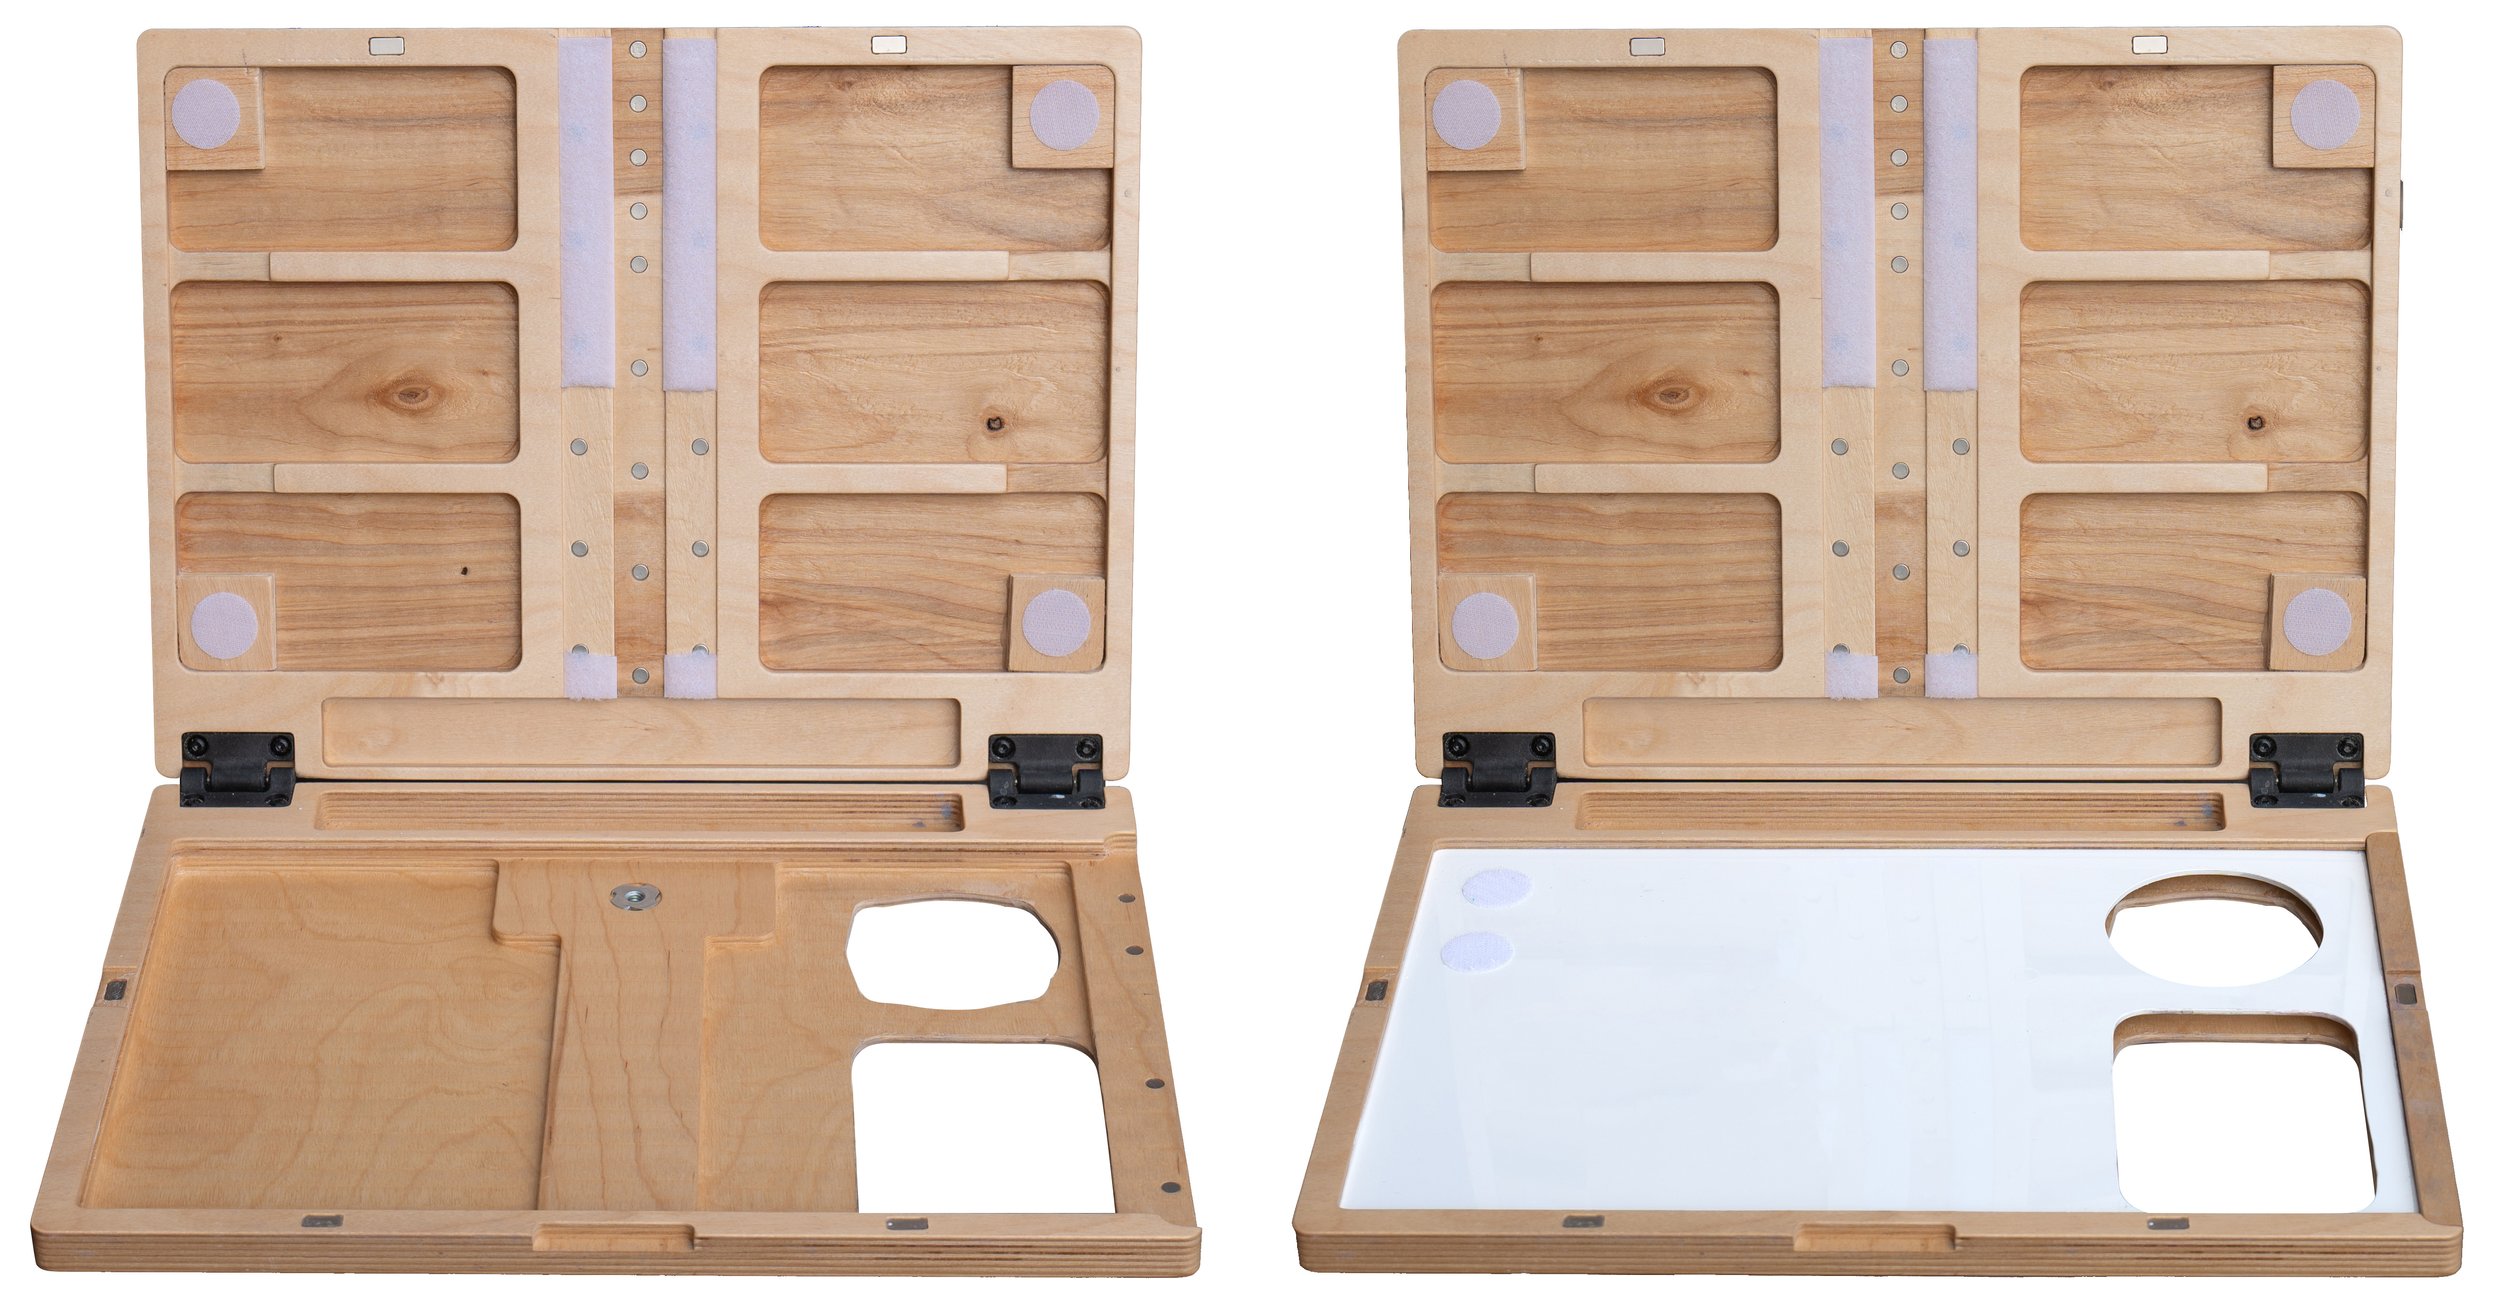
For the water cup, we cut a circular hole 3 in. (7.5 cm) in diameter, which fits the folding Faber-Castell Click & Go Water Cup perfectly. Ultimately, I opted for a transparent plastic tupperware cup because it's practically invisible, but the original plan was to cut a hole that would snugly fit the folding cup. As for the paper towel holder, we made a 3¼ x 4½ in. (8.2 x 11.5 cm) opening to accommodate my Lock & Lock rectangular container, which is deep enough to hold a few paper towels. This ensures I don't have to worry about the towels becoming too saturated with water too quickly and losing their ability to dry my brush effectively.
So, the bottom part of my new pochade box was almost finished, and we moved on to its upper part, which was the lid of the box. The U.Go easel has two stainless steel panel holders that slide up and down on magnets. Unfortunately, the magnets are not strong enough to hold a medium-weight sketchbook; they simply fell off the lid when I tried to install a sketchbook between them. Therefore, we needed to figure out how to adapt the lid for use with my favorite sketchbooks.
The other issue was with the irregular surface of the lid's interior, which made it impossible to attach a loose sheet of paper with tape. The solution came quickly, as my husband had previously addressed a similar issue with my Guerrilla box. He cut a piece of white plastic to the size of the lid and attached it to the lid using Velcro. The box wouldn't close with the plastic attached to the interior side of the lid, so we glued four pieces of Velcro to the outer corners of the lid. This way, when I detach the plastic to close the box, I can attach it to the outside, making them one unit.

We could have permanently affixed a sketchbook support on that piece of plastic, but I needed the support to be adjustable to accommodate different sizes of sketchbooks. Larger sketchbooks need to be placed slightly lower, whereas my tiny 6” x 4” sketchbooks are more comfortable to use when positioned closer to the top of the easel.

Here’s how we made this possible: we glued together two strips of thick but lightweight plastic to form a short square bar (I think a wooden square dowel might have worked as well). We then inserted eight magnets along one side of this bar and attached the same number of magnets in two different positions on the back of the white plastic that covered the lid, securing them with Kraft paper tape. This allowed the bar to be positioned either higher or lower, depending on the size of my sketchbook. The magnets held the bar firmly in place, even with my heaviest sketchbooks.
To enhance the grip of the sketchbook support, I affixed a strip of the tape tennis players wrap around their rackets for a better hold. Although this rubber tape is prone to staining, it effectively keeps my sketchbooks stationary on the bar.
After all the modifications, the easel could now accommodate the two cups I needed for painting, any of my sketchbooks, and, if necessary, a loose sheet of paper could be taped to the white plastic on the lid. Ordinary masking tape, being low tack, didn’t secure the paper sufficiently, so I opted for this artist console tape instead. It’s much stronger yet doesn’t damage watercolor paper upon removal.
My clip lights could be easily attached to the box's lid underneath the white plastic, making the pochade box nearly ready for a field test. There was just one issue left to resolve – securing my brush holder cup to the easel. The cup, typically filled with many brushes, is quite heavy, and considering the box's thin walls, drilling into it to attach the cup seemed risky. We needed a more elegant and less invasive solution.
Ironically, attaching a brush holder to the box turned out to be the most interesting and challenging part of the process. We spent about two weeks experimenting with various methods before the right idea finally emerged. And it was so simple that we were amazed we hadn't thought of it earlier.
We drilled two holes into each of the four sides of a square plastic cup, threaded a plastic zip tie through them, and fastened it on one of the sides, creating a loop the size of my water cup's diameter. When the water cup is filled, it becomes heavy enough to sit securely in the bottom part of the pochade box, so we decided to use it to anchor my brush holder. I simply slip the loop of the zip tie over the part of the water cup that extends from the bottom of the box, and it holds the brushes in place perfectly. To transform this cup into a brush storage container, we cut down a second identical cup so it could snugly fit into the main cup, serving as a lid. I transport my brushes in an upright position in my backpack. This way, the container ensures the brushes are protected from damage by other items in the backpack.

The next addition to my setup was a small plastic cup with a lid, which I attached between the left wall of the pochade box's base and my storage palette. Knowing I'd be painting in Capri during the hottest season, I planned to use Permanent White mixed with W&N blending medium (or propylene glycol) in a ratio of 4 parts paint to 1 part medium. This mixture prevents the paint from drying too quickly. Since the medium makes the paint more fluid, it's more practical to store it in a cup next to the mixing palette rather than directly on the tray. To close the pochade box, I would have to remove the cup and store it in my backpack.

Now, the setup was ready for testing. I placed the pochade box on my old tripod by the studio window and painted three 20-minute studies. The hinges attaching the lid to the box's base remained firm as I applied pressure with my brush. There was ample mixing space. The brush cup stayed firmly in place. The sketchbook support held steady, and the pochade box didn't wobble on the tripod. It proved to be very stable.
Everything seemed perfect, but a single issue became apparent when I tried to clean my mixing palette between studies. I sprayed the mixing surface with clean water and started rubbing it with a paper towel to remove the dried paint, aiming to start a new study with a clean palette. However, I discovered that removing completely dried gouache colors was neither easy nor quick. Normally, when I paint from life, whether in the studio or on location, I keep a spare, clean palette on hand. This allows me to change palettes once the one I'm using becomes fully covered with paint, which saves a great deal of time, especially under rapidly changing lighting conditions.
While testing this new setup, I found myself spending too much time cleaning the palette. Fortunately, the solution to this problem was straightforward. I asked my husband to trim two of my mixing trays slightly so they would fit between the left wall of the pochade box's base and the cup for paper towels. Once he did that, I had two clean palettes at the ready. If both became completely covered with paint, I could then use the base plastic layer as my mixing area. I use the inner detachable part of this palette as my mixing tray.

This was the final tweak to my new plein air setup. Before taking it to Capri, I conducted several tests, and it performed flawlessly each time. In Capri, I completed 38 plein air studies, and the setup proved to be easy to assemble and disassemble, as well as comfortable to work with.
Initially, I thought it would be a temporary solution for when I travel by plane, but it turned out that I prefer my new setup for its compactness. The U.Go pochade box fits neatly into my 15" laptop backpack, alongside all my other essential painting gear, with the exception of the tripod, which I attach to the outside.
Having described most of my plein air painting equipment, I'll complete the list by naming everything I carry in my backpack for outdoor painting sessions.

In the notebook compartment, I carry:
The modified U Go pochade box, with the white plastic attached to its lid on the outside.
An A4 folder containing a few loose sheets of paper of various sizes.
In the external pocket of the backpack go the following items:
Two clip lights that I attach to the pochade box lid for painting.
My mobile phone.
A hat.
A compact camera. Taking photographs alongside painting from life is vital; if my initial study is successful, I can develop it into a more elaborate piece. The photo provides crucial shape and detail references, while the study itself informs my color choices.
In the main compartment of the backpack I pack:
My storage palette, placed at the bottom because it needs to be carried horizontally to prevent colors from mixing.
The two containers – one for water and one for paper towels. The water container fits inside the paper towel container, conserving space.
The container holding brushes, a couple of pencils, and a mirror, which I use to view my paintings from a different perspective. This often reveals inaccuracies in color, value, and proportion.
A handy toiletry bag, which is compact yet has many compartments.

In this bag I store various smaller painting items:
The detachable support for sketchbooks.
A small dropper bottle containing Permanent White mixed with W&N Blending Medium (or Propylene Glycol), which I prefer in hot weather.
An eraser for minor drawing corrections, though I rarely use it as the drawing is usually covered by paint.
The white console tape for attaching loose sheets of paper to the plastic board on the easel’s lid.
Two metallic binder paper clips that I use to hold my sketchbook pages together while painting.
A selection of small tubes of my most-used colors: yellow ochre, cerulean blue, and ultramarine blue.
Next, into the backpack go these items:
A small roll of paper towels.
For the tripod, I slide the legs into one of the two side pockets on the backpack’s exterior and secure the upper part to the backpack's handle using a cotton cord. In the other side pocket, I place a small bottle of water for the brushes.
My backpack becomes quite heavy when fully packed, so occasionally, I choose to carry the tripod in my hands to alleviate the weight on my shoulders.

Plein air painting is not for the faint-hearted. It's always an adventure and involves hard work, often pushing you out of your comfort zone. The weather is rarely ideal, and adapting to unpredictable factors is a common challenge. That's why the comfort of your plein air setup is crucial - it can be the only constant in the ever-changing environment. While numerous distractions can occur on location, a reliable painting setup greatly increases your chances of success.
I hope you found this helpful :)
Happy painting!
Lena
Download my free 30-page PDF, “Everything you Need To Know About Gouache”
In this 30-page PDF you will learn:
How to decide which colors you need when you start with gouache and how you can expand your palette to make it even more effective.
What kind of storage palettes to use with gouache to prevent your beautiful colors from fast drying.
Why you need to use two whites with gouache.
How to choose the right paper and what kinds of brushes work best with gouache.
About the setup that I like using for plein air painting with gouache.
You will also be provided with many useful tips that will make your painting experience smoother.